Summary: Read on this article, you can get the hints how to import and edit Panasonic HC-X900M MTS footage with Final Cut Pro X, FCP 6/7 both in 2D and 3D flawlessly without any issue.
Panasonic ups the image quality ante with its new HC-X900M: a camcorder that packs a ton of visual punch and is equally at home in both the 2D and 3D worlds. With the addition of the optional 3D conversion lens, the X900M is capable of producing stunning 3D images in full HD. When you got some 3D footage, you may want to import 3D AVCHD to FCP or other Mac tools for editing to get a better effect video.
The only problem we are facing is that how can we import that kind of footages into your Final Cut products. We found that Apple does not built in stereoscopic (3D) editing tools in FCP X. So it is difficult for these camcorder users to edit these 3D AVCHD videos in FCP X. Well, don’t’ worry. Here I will introduce one cool tool to you to help you import 3D .mts to FCP X, FCP 6, 7.
Download and install Brorsoft 3D AVCHD Converter for Mac
This professional app helps you import native 3D stereoscopic AVHCD footage(2D as well) and export Apple ProRes 422 encoded .mov video, which can be imported to Final Cut Pro 7 and X without rendering. You can convert 3D MTS to 2D MOV video, or encode 3D AVCHD footage to Anaglyphic 3D that is also compatible with FCP X. Plus, this Mac MTS Converter also provides optimal presets for iMovie, FCE, Adobe Premiere Pro, Avid Media Composer, etc, ensuring smooth editing with different video editing programs on Mac OS X.
Part I: How to convert 3D(standard 2D) AVCHD from Panasonic HC-X900M to Apple ProRes for FCP
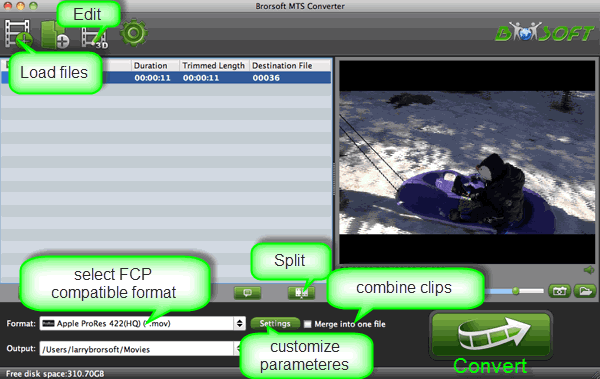
Step 1: Launch the 3D MTS to ProRes Converter and load your .mts/.m2ts files to it from your camcorder.
Step 2: Click “Format” bar and set “Final Cut Pro >> Apple ProRes 422 (*.mov)” format. If you prefer smaller file size, please choose “Apple ProRes 422 (LT) (*.mov)” instead.
Step 3: Hit the Convert button to transcode 3D AVCHD footage to Apple ProRes for FCP X or FCP 6/7 on Mac. When conversion finishes, press “Open” button to get converted MOV video for FCP.
Step 4: Open FCP X, and go to “File>>Import>>Files…” to import converted 3D footage to FCP X project.
Part II: How to Add Anaglyphic 3D effect for your footage
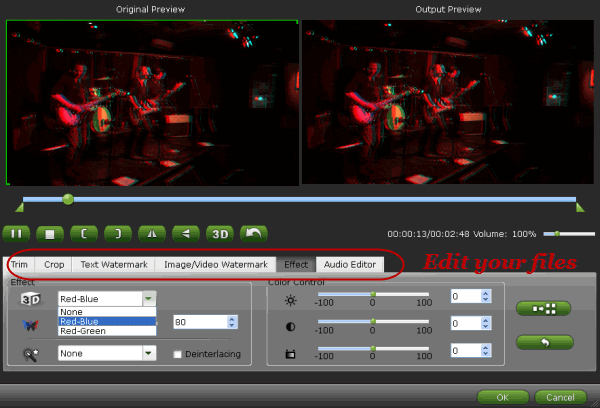
If necessary, click “Edit” icon to start video editing with your 3D files, such as adding Anaglyphic 3D effect(Red-Blue, Red-Green) as well as adding watermark, trim your videos and so on.
More useful guides:
What if AVCHD plugin NOT working?
How to Convert and Edit 3D MTS files
How to Transcode and Merge multiple MTS clips
How to import individual .mts files to Final Cut Pro
Panasonic1080 60p AVCHD and FCP workflow
Import Panasonic HC-X920 60p AVCHD to iMovie'11
Get Panasonic HC-X920 60p/50p AVCHD into FCP 7
Solve Panasonic HC-X800 AVCHD to iMovie Importing Issue


